Last Topic

Tampilkan postingan dengan label Word. Tampilkan semua postingan

PDFtoWord.com Does Exactly What It Says

Selasa, 15 Juni 2010

Today we ran into an issue in the Technology Center: A patron was trying to convert a PDF (Portable Document Format) into a Microsoft Word document. For those of you that do not know how PDFs work, they are similar to a picture in that you can view them, but you cannot change their contents. PDF files do not allow editing with any free software, nor do they allow the user to save them in the Word format. This can be problematic for users.

This is where PDFtoWord.com steps in. This site does exactly what you would think: it converts PDF files into editable Word documents. It is very easy to use: Simply click on Browse, upload your file, and provide an email address where you want to receive your your converted file. Note: Be sure to un-check the "Receive PDF to Word news from Nitro," beneath where you enter your email address.

PDFtoWord.com is free to use, and great for handling your PDF to Word conversion needs!

Office 2007 Training from Scratch

Sabtu, 25 Juli 2009
Are you looking to learn Office 2007 from scratch? The Microsoft Office website has an excellent resource for learning Word, Excel, Outlook and PowerPoint. Geared to the true beginner, this training walks you through Office 2007 programs step-by-step.

Microsoft Office 2007 Service Pack 2 Released

Selasa, 28 April 2009
Users of Microsoft Office 2007 should check their Windows Update to receive the new Service Pack 2 that was released on April 28.

The new service pack has a long list of improvements to the Microsoft Office suite of products. For the complete list, check out this link (Excel file).

Some of the highlights of this release are as follows:
  • Speed improvements to Microsoft Outlook
  • The "Save as PDF" option has been implemented throughout the entire Office suite
  • Support has been added for the ODF format (Open Document Format)
  • Various bugs have been fixed
If you can't wait to grab Service Pack 2, go to this link to pick up the download.

Write Better with Microsoft Word Readability Statistics

Selasa, 17 Maret 2009
I write a lot in both my professional and in my personal life. I like to write, so I look for ways to improve my writing.

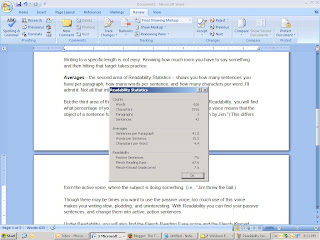
One way that I have improved my writing is with a Microsoft Word tool called Readability Statistics. Readability Statistics is that gray box that pops up after you do a spell check in Word. Many people ignore this pop-up. But if you want to improve your writing, pay attention to it.

First, you have to make sure you turn on the Readability Statistics tool. That’s simple.

In Word 2007, click on the Windows button in the top left corner of your screen, and then on Word Options. When you are in the Word Options pop-up, click on Proofing on the left, and then under When correcting spelling and grammar in Word, make sure that Show readability statistics is checked.

In Word 2003, click on the Tools drop-down menu, then Options, then the Spelling and Grammar tab. Toward the bottom of the tab, under Grammar, make sure the Show readability statistics is checked.

Now, after you spell check your document, the Readability Statistics will pop up.


The pop-up has three areas.

The first – Counts – tells you how many words, characters, paragraphs, and sentences are in your document. Though you might not need to know how many characters your document has, knowing how many words it has is often helpful.

Say you are writing an article, and your editor is saving space for your 1,500 word masterpiece. She won’t be pleased if you turn in only 400. Or say your boss asks you to read an article and write a 250-word abstract he can digest before a big meeting. He won’t be happy if you give him 2,000 words.

Writing to a specific length is not easy. Knowing how much room you have to say something and then hitting that target takes practice.

Averages – the second area of Readability Statistics – shows you how many sentences you have per paragraph, how many words per sentence, and how many characters per word. I’ll admit it: Not all that interesting.

But the third area of the Statistics – Readability – is very useful. Under Readability, you will find what percentage of your sentences is in the “passive voice.” The passive voice means that the object of a sentence has something done to it. (i.e., “The ball was thrown by Jim.”) This differs from the active voice, where the subject is doing something. (i.e., “Jim threw the ball.)

Though there may be times you want to use the passive voice, too much use of this voice makes your writing slow, plodding, and uninteresting. With Readability you can find your passive sentences, and change them into active, action sentences.

Under Readability, you will also find the Flesch-Reading Ease score and the Flesch-Kincaid Grade Level score. Both tell you toward what level your writing it geared. The first is based on a 100 point scale. The higher the score, the easier it is to understand your document. The second is based on U.S. school levels. A score of 8.0, for instance, means that your writing it geared toward an eighth grade reading level.

So if you are preparing a lesson plan for your 4th grade class, and your Flesch-Kincaid Grade score is 11.5, you might want to rewrite: make your sentences shorter, use fewer big words, etc. Likewise, if you are finishing up your doctoral thesis, and your Grade score is 4.0, you probably need to beef up your text.

If you want to improve your writing, and more closely gear it toward your audience, keep an eye on the Readability Statistics.

By the way, this post has 626 words and is geared toward a 7.6 grade reading level.

Best of Office Online: 2008

Rabu, 17 Desember 2008
Microsoft has released a list showing their most popular Office Online resources for 2008. Categories include templates, clip art, training courses, and columns. This list includes resources for both Office 2003 and Office 2007.


Adding Your Document Name in Microsoft Word

Kamis, 02 Oktober 2008
It is very easy to display the document name in the footer of a Word document.

On the Insert tab, click on Footer, then click on Edit Footer.

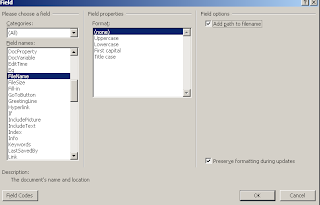
A new Header & Footer tab will appear on the ribbon. In the Insert group, click on Quick Parts, then click on Field.


Scroll down in the Field Names box and select FileName. You also have the option to select the Field Properties (ie, case) of the File Name and, whether you want the path of the document to be displayed (by checking Add path to file name.)

For example, with path selected the document would be displayed as C:\Documents and Settings\techroom\Document1.doc in the footer.


You can also add the document name to the Header if you prefer. Follow the same procedure, except click on Header instead of Footer in the Insert tab.

Mouse-less Navigation in Office 2007

Selasa, 30 September 2008
Keyboard shortcuts are one of my favorite things about Microsoft Office. I've always preferred using the keyboard shortcuts over the mouse; I don't have to take my hands off the keyboard that way, and my speed increases.

So, I was thrilled when I saw the great new keyboard shortcut layout in Office 2007. This feature overlays the keyboard shortcuts on top of your Office 2007 ribbon.

To activate the layout, hit the Alt key. The shortcut labels will be overlayed on the ribbon. Then, you can navigate simply by hitting the appropriate label on the keyboard. Navigation between the various tabs and functions becomes as easy as pressing the letters assigned!


click for a larger view
To de-activate the shorcut overlay, just hit the Alt key a second time.

This overlay will show up in all Microsoft 2007 Office products that have the ribbon interface.

Change the Color Scheme in Microsoft Office 2007

Sabtu, 27 September 2008
Feeling blue? How about silver?

Well, now you can change your color scheme in any Microsoft Office 2007 software to blue, silver, or black, using the Options command. (For this post, I will demonstrate in Word.)

First, click on the Office button in the top left corner, and then click on Word Options at the bottom of the pop-up menu.


Make sure you are under the Popular heading (on the left). Then look for Color Scheme. Click on the drop-down arrow next to the choices and select the color you want (blue, silver, and black).


Click on OK at the bottom of the menu. Your new color scheme will appear immediately.

(For more tips on Microsoft Word and other Office products, enter the program name into the dialog box at the top left of this blog page, and click on Search Blog. You'll see what other tips the Tech Desk has to offer.)

Use Split to Speed Up Your Navigation in Microsoft Word

Rabu, 24 September 2008
Looking for ways to speed up navigation in Microsoft Word? Use the Split function to split your screen in two!

It's easy to use Split. Hit Ctrl+Alt+S to activate the function. (In Office 2007, you can also click on the View tab and then Split in the Windows group.) Once the feature is active, it will split your screen in half, allowing two separate independent navigation windows for the same document. This can be extremely helpful if you want to look at two different parts of a large document without having to leave either section.

Hitting Ctrl+Alt+S a second time (or clicking on the View tab then Remove Split in the Windows group) will turn off the split screen.

This function is also possibl
e in older versions of Microsoft Word, but you will have to use the keyboard shortcut.

Check below for a screen shot of this feature in action.

The Power of the Microsoft Office 2007 Clipboard

Selasa, 16 September 2008
The clipboard in Microsoft Office 2007 is one of the most under-utilized functions in the entire suite of Office programs. Many of us use the basic copy and paste, but we neglect the other power features of this tool. Today I will cover some of these power features and their uses.

Copy Multiple Items Into Your Clipboard

Much to nearly everyone's surprise, the clipboard can hold more then one clip at a time! To see for yourself, open up your favorite Office 2007 program (Word and Excel work best) and click on the Show Office Clipboard Pane button in the Clipboard grouping. Now, begin copying text from anything you like. I copied some things from Firefox, a favorite browser among the Technology staff here at the Library. You'll notice a small pop-up in the bottom right corner of your screen:


You'll notice that the clipboard says "3 of 24:" I've copied information into 3 of my 24 clipboard available slots. Go back into the Office program you have open, and you'll be able to see the items in your clipboard (right).

You'll notice that each piece of information includes either a mini-thumbnail, for images, or the first few words, for text, in the clipboard. Now, click on an item in the clipboard and it will instantly be pasted into your file.

The Paste Special Command

The paste special command is one of my favorites in MS Office. Frequently when searching the internet I come across text that I want to copy that has multiple types of formatting. When I paste the text into a Word Document I get a jumble of various word formatting that looks terrible.

Here is where the paste special command can help. Click on the drop down arrow under Paste and choose Paste Special. Now choose your selection. In this this example, I would choose unformatted text. Voila! You have clean, unformatted text added to your document.


These are just a few of the main features of this helpful clipboard tool.

Get Back Your Classic Microsoft Office Dropdown Menus with the Toolbar Add-In

Selasa, 09 September 2008


Do you miss the classic Office 97-2003 toolbar in Office 2007? Do you want the familiar dropdown menus back?

Well, you just might be in luck. Computer geek Shah Shailesh has released the classic Office toolbar as an add-in for Microsoft Word, Excel, Powerpoint, and Access. The installation is simple: download the add-in, extract the file and run it. You'll instantly see a new add-in tab added to the top of the Office 2007 ribbon. Click the add-in tab and you'll be presented with the classic Office 97-2003 dropdown menus.

While you are there, check out the other cool add-ins Shah Shailesh has available.

Remove the Annoying Mini Toolbar in Microsoft Office 2007

Selasa, 26 Agustus 2008
Bad mini toolbar!

Have you been typing in Microsoft Word 2007, only to see a miniature toolbar randomly pop up and obstruct your viewing and typing?

That mini toolbar is a new feature in Office 2007. Many people, including myself, find it to be quite a nuisance.

To get rid of that toolbar, and free yourself from its ghost-like appearances, click on the Office button in the top left of your Word screen, go to Word Options, and un-check the Show Mini Toolbar on Selection option located under the Popular tab. Then click Ok and you're set -- no more annoying mini toolbar!

And, if you later decide you miss the toolbar you can always bring it back by rechecking the box.


Note: The mini toolbar will show up in all Microsoft Office 2007 programs: Excel, Outlook, Powerpoint, etc. You will have to disable it through the same method above in each program, under Options located at the bottom of the Microsoft Button menu.

Introducing Intermediate Word Class at TPL

Kamis, 24 Juli 2008
You asked for it and you got it!

The Library is pleased to announce our new Intermediate Microsoft Word class. We've offered a Basic Word for Beginners class for some time, and it has been very successful. In fact, 123 patrons have attended the class in 2008 so far. These students learned how to create documents, change the text font and color, format paragraphs, and work with clip art, pictures, tables and spellcheck. But you wanted more.

The Intermediate Word class will cover topics such as creating mailings with Mail Merge, how to improve your documents with WordArt, SmartArt, Templates, and more. Of course, class attendees should have some previous experience with Microsoft Word.

The two-part class will be offered on September 22 and 29; October 20 and 27; and November 12 and 19. The classes are conveniently scheduled for 6:30 - 8:30 in the evening.

Registration for this class -- and all our fall classes -- begins August 12, at 10:00 am. Register on line, or by calling the Technology Center at 248-524-3542.

Go Forward and Back Quickly in Word 2007

Senin, 14 Juli 2008
Have you ever been typing a lengthy document, needed to edit something on a different page, and then needed to quickly return to where you were typing? Well there is an almost hidden feature in Word 2007 that will allow you to do this.

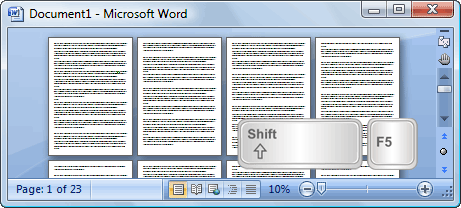
After you go to a different part of your document to make changes, hit Shift+F5. You'll instantly return to where you last were typing! Now if you were to hit Shift-F5 again then you could return to the page where you were making your changes.

So, for instance, if you were typing on page 21 and needed to edit something on page 5, go to page 5 and make your changes. When done, hit Shift+F5, and you will return to where you were at on page 21. To go back to page 5 for more changes, hit Shift+F5 again.

This very helpful tip that was found at Digital Inspiration . Picture shown above was also taken from the site.

Last Photo